|
Creating a Symbol
You are now ready to turn the graphic (the ellipse)
you created into a symbol and store the graphic in the Library.
Items stored in the Library can be used later.
-
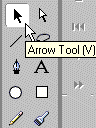
Select the Arrow tool.
-
Double-click on the ellipse.
-
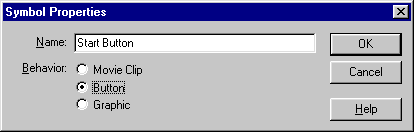
Choose Insert > Convert to Symbol
from the menu. The Symbol Properties dialog box will open.
-
Type Start Button in the Name field.
-
Select Button as the type of behavior.
-
Click on OK.
-
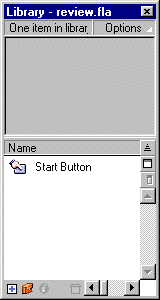
Choose Window > Library from
the menu. The Library panel will open. You should see Start
Button in the Library window.
-
Press the Delete key to delete the ellipse from
the Stage. Dont worry. You have a copy of the Start Button
in the Library.
Note: When a panel is open (for example, the
Library or Stroke panel) you can leave it open for future use. If
a panel gets in your way, use the Tab key to toggle the panel display
on and off.
-
Press the Tab key. The Library panel (and the
Stroke panel if it is open) should disappear.
-
Press the Tab key again. The Library panel (and
the Stroke panel if it is open) should reappear.
Gradients
When you click on the Fill color box, the Fill dialog
box shown here will open.
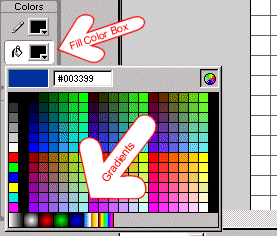
Gradients display on the bottom row and show gradations
of color. You will use a gradient to create the movies sky. First,
you must create the gradient you will use.
To create the gradient:
-
Choose Window > Panels > Fill from
the menu. The Fill panel will appear.

-
Select Linear Gradient from the drop-down menu.
- Click on the first Edit Gradient Range icon. A color box will
appear.
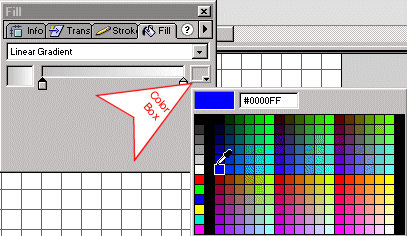
-
Click on the color box and select blue.
-
Click on the second Fill Gradient Range icon.
Click on the color box and select white.
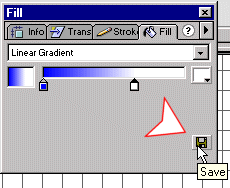
- Move the second Fill Gradient Range icon to the three-quarter
point on the Gradient Range slider.
-
Click on the Save icon.
The Rectangle Tool
You use the Rectangle Tool to draw rectangles and squares. In this
exercise you will create a rectangle and fill it with the gradient
you just created. You will then turn the resulting graphic into
a symbol and use it later to create the sky.
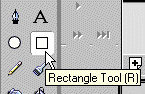
- Select the Rectangle tool.
- Move to the Stroke panel. If the Stroke Panel is not open, choose
Window > Panels > Stroke from the menu to open it.
- In the Stroke Panel, select Hairline from the drop-down menu.
- In the Stroke color box, select black.
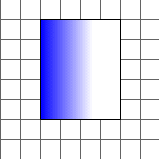
- In the Fill color box, select the gradient you created.
- Click on the Stage and drag diagonally to create a rectangle.
Later you will use the graphic you just created. For now, turn
it into a symbol.
- Select the Arrow tool.
- Double-click on the graphic.
- Choose Insert > Convert to Symbol from the menu. The
Symbol Properties dialog box will open.
- Type Sky in the Name field.
- Select Graphic as the Behavior.
- Click on OK to store the graphic in the Library.
- Press the Delete key to remove the graphic from the Stage.
|